In any multi-user operating system, controlling who can access and modify files is not just a feature—it’s the bedrock of security and stability. For anyone working in Linux Administration, from managing a personal project on a Linux Server to orchestrating complex deployments in a Linux DevOps environment, a deep understanding of file permissions is non-negotiable. This system, elegant in its simplicity yet powerful in its application, dictates the rules of engagement for every file and directory on your system.
This comprehensive guide will take you from the fundamental concepts of ownership and permissions to advanced techniques like special modes and Access Control Lists (ACLs). We will explore the essential Linux commands that put you in control, such as chmod and chown, and discuss the best practices that separate a novice from a seasoned system administrator. Whether you’re a student learning for an Ubuntu tutorial, a developer deploying on a Red Hat Linux instance, or an engineer automating with Python scripting, mastering file permissions is a critical step toward effective and secure system management.
Understanding the Foundation of Linux Permissions
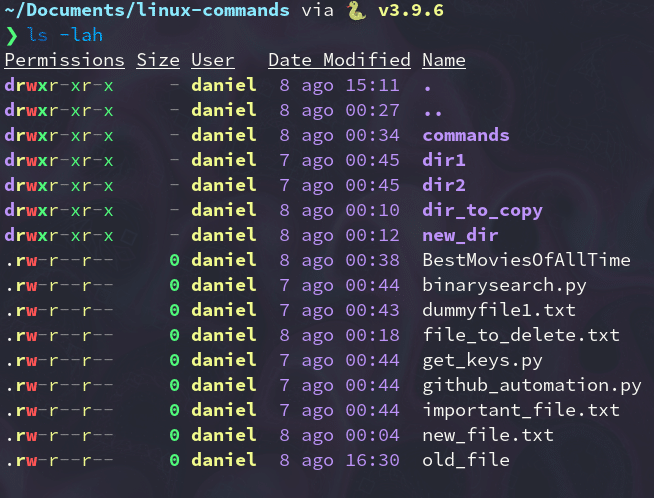
At its core, the standard Linux permission model is built on two simple ideas: who can access a file, and what they can do with it. This model, often called the UGO/RWX model, provides a robust framework for securing the Linux file system. To see it in action, simply run the ls -l command in your Linux terminal.
$ ls -l
total 8
-rw-r--r-- 1 alice developers 1024 Oct 26 10:30 config.yml
drwxr-x--- 1 bob   developers 4096 Oct 26 11:00 project_files
-rwxr-x--- 1 alice developers  512 Oct 26 10:45 deploy.sh
The cryptic string of characters at the beginning of each line, like -rw-r--r--, is where the permission story begins.
The Three Tiers: User, Group, and Other
The first character indicates the file type (- for a regular file, d for a directory, l for a symbolic link, etc.). The next nine characters are broken into three sets of three, representing the permissions for three distinct identity classes:
- User (u): This is the owner of the file. The owner has the most control and their permissions are defined by the first set of three characters (e.g.,
rw-). In the example above,aliceis the owner ofconfig.yml. - Group (g): Every file is also assigned to a group. This allows multiple users who are part of the same group to share access to a file based on the group’s permissions, defined by the second set of three characters (e.g.,
r--). Both files above belong to thedevelopersgroup. - Other (o): This category includes every other user on the system who is not the owner and does not belong to the group. Their permissions are defined by the final set of three characters. This is often referred to as “world” permissions.
The Three Actions: Read, Write, and Execute
Each of the three identity classes (User, Group, Other) can be granted a combination of three basic permissions. The meaning of these permissions changes slightly depending on whether the item is a file or a directory.
- Read (r):
- On a file: Allows a user to open and view the contents of the file.
- On a directory: Allows a user to list the names of the files and subdirectories within it (i.e., run
ls).
- Write (w):
- On a file: Allows a user to modify or delete the content of the file.
- On a directory: Allows a user to create, delete, and rename files within that directory. Note that to delete a file, you need write permission on the directory containing it, not necessarily on the file itself.
- Execute (x):
- On a file: Allows a user to run the file as a program or a script (e.g., a Bash scripting file).
- On a directory: Allows a user to enter the directory (i.e., use the
cdcommand) and access its contents.
Managing Permissions with Essential Linux Commands
Understanding the theory is one thing; applying it is another. Linux provides a suite of powerful utilities for managing file permissions and ownership. The most critical of these are chmod, chown, and chgrp. These are fundamental Linux commands for any level of system administration.
The `chmod` Command: Changing Modes
The chmod (change mode) command is used to modify the permissions of a file or directory. It can be used in two primary ways: symbolic mode and octal (numeric) mode.
Symbolic Method
The symbolic method is more intuitive as it uses characters to represent the classes, operators, and permissions. The syntax is chmod [who][operator][permission] file.


- Who:
u(user),g(group),o(other),a(all). - Operator:
+(add),-(remove),=(set exactly). - Permission:
r(read),w(write),x(execute).
For example, to make a shell script executable for the owner (user) and remove write permissions for the group and others:
# Make a script executable for the owner and remove write for group/other
$ chmod u+x,go-w my_script.sh

# Set permissions exactly: owner can read/write, group can read, others have no access
$ chmod u=rw,g=r,o= my_app.conf
Octal (Numeric) Method
The octal method is faster for setting all permissions at once and is commonly seen in documentation and scripts. It represents permissions with numbers:
- Read (r) = 4
- Write (w) = 2
- Execute (x) = 1
These values are added together for each class (User, Group, Other). For example, rwx would be 4+2+1=7, r-x would be 4+1=5, and r-- would be just 4. A three-digit number represents the permissions for UGO. For instance, chmod 754 file.txt sets permissions to rwxr-xr--.
# Set permissions to rwxr-xr-x (owner: rwx, group: r-x, other: r-x)
# This is common for executable scripts and directories.
$ chmod 755 executable_script.py

# Set permissions to rw-r--r-- (owner: rw-, group: r--, other: r--)
# This is a safe default for non-executable files.
$ chmod 644 web_page.html

# To apply permissions recursively to a directory and all its contents
$ chmod -R 644 /var/www/html/assets
Changing Ownership: `chown` and `chgrp`
Permissions are useless without correct ownership. The chown (change owner) and chgrp (change group) commands handle this.
chown: Changes the user and, optionally, the group owner of a file or directory. Using it requires superuser privileges (sudo).chgrp: Changes only the group owner.
A common use case is setting ownership for web server files. On a Debian or Ubuntu Linux system, the Apache or Nginx web server often runs as the www-data user.
# Change the owner of a file to the 'www-data' user
$ sudo chown www-data /var/www/html/config.php

# Change both the user and group owner in one command
$ sudo chown www-data:www-data /var/www/html/uploads

# Recursively change ownership of an entire directory
$ sudo chown -R myuser:mygroup /opt/my_application
Advanced Permissions and Special Modes
Beyond the basic UGO/RWX model, Linux offers special permission bits that grant elevated privileges or unique behaviors. These are critical for Linux security and advanced system administration but must be used with caution.
The Special Bits: SUID, SGID, and the Sticky Bit
These three special modes are set using the octal method with a leading digit (e.g., chmod 4755) or symbolically.
SUID (Set User ID)
When the SUID bit is set on an executable file, any user who runs that file executes it with the permissions of the file’s owner, not the user who ran it. The classic example is the passwd command, which needs to modify the /etc/shadow file (owned by root) even when run by a non-root user. The SUID bit appears as an s in the user’s execute permission slot (-rwsr-xr-x).
- Symbolic:
chmod u+s file - Octal:
chmod 4755 file(The ‘4’ sets SUID)
Warning: SUID can be a major security risk. Never set the SUID bit on scripts, and be extremely cautious when applying it to compiled programs, as it can lead to privilege escalation vulnerabilities.
SGID (Set Group ID)


The SGID bit has two effects:
- On a file: The file executes with the authority of the file’s group owner.
- On a directory: This is its most common and useful application. Any new file or subdirectory created within an SGID directory will automatically inherit the group ownership of that directory, rather than the primary group of the user who created it. This is invaluable for collaborative project folders. The SGID bit appears as an
sin the group’s execute slot (drwxr-sr-x).
- Symbolic:
chmod g+s directory - Octal:
chmod 2775 directory(The ‘2’ sets SGID)
Sticky Bit
When the sticky bit is set on a directory, it restricts file deletion. Even if a user has write permissions on the directory (like the /tmp directory, which is often mode 777), they can only delete or rename files that they personally own. This prevents users from deleting each other’s files in a shared, world-writable space. The sticky bit appears as a t in the other’s execute slot (drwxrwxrwt).
- Symbolic:
chmod +t directory - Octal:
chmod 1777 directory(The ‘1’ sets the sticky bit)
Beyond the Basics: Access Control Lists (ACLs)
Sometimes, the UGO model isn’t granular enough. What if you need to grant access to a file to its owner, its primary group, and also one other specific user? This is where Access Control Lists (ACLs) come in. ACLs allow you to add permissions for specific users and groups beyond the three standard classes. The primary tools are setfacl (to set ACLs) and getfacl (to view them).
# First, view the current ACLs on a file
$ getfacl project_report.docx
# file: project_report.docx
# owner: alice
# group: developers
user::rw-
group::r--
other::---

# Now, grant read/write access to a specific user named 'charlie'
$ setfacl -m u:charlie:rw project_report.docx

# View the ACLs again to see the change
$ getfacl project_report.docx
# file: project_report.docx
# owner: alice
# group: developers
user::rw-
user:charlie:rw-
group::r--
mask::rw-
other::---
The + sign at the end of the permission string in ls -l (e.g., -rw-rw----+) indicates that a file has an ACL applied.
Best Practices for Secure File Management
Knowing the commands is only half the battle. Applying them wisely is what defines good Linux administration and robust Linux security.
The Principle of Least Privilege


This is the golden rule of security. Every user, process, and application should have only the bare minimum permissions required to perform its function.
- A web server user like
nginxorapacheshould not own the web files. It should have read-only access to most content and write access only to specific directories for uploads or caching. - User home directories should be mode
700or750, never755or777, to prevent other users from snooping. - Configuration files containing sensitive data (e.g., database passwords) should be owned by root and have permissions of
600or640.
Default Permissions with `umask`
The umask command sets the default permissions for newly created files and directories. It works by “masking” or subtracting from the system defaults (666 for files, 777 for directories). A common and secure umask is 022, which results in default permissions of 644 for files and 755 for directories. An even more secure umask is 027, which prevents the group and others from having any access by default.
Auditing and Monitoring Permissions
Periodically, you should audit your file system for insecure permissions. The find command is an excellent tool for this.
- Find all world-writable files:
find / -type f -perm -002 - Find all SUID/SGID files to review them for security risks:
find / -type f \( -perm -4000 -o -perm -2000 \) -ls - Find files owned by a user that no longer exists:
find / -nouser
For more advanced security, tools like SELinux (on CentOS/Red Hat Linux) or AppArmor (on Debian/Ubuntu Linux) provide Mandatory Access Control (MAC) systems that add another layer of security on top of standard file permissions.
Conclusion
Linux file permissions are a deep and essential topic, forming the core of system security and multi-user collaboration. We’ve journeyed from the basic UGO/RWX model to the practical application of chmod and chown, and further into advanced concepts like SUID/SGID bits and the fine-grained control offered by ACLs. By embracing the principle of least privilege and using tools like umask and find to maintain a secure configuration, you can protect your systems from unauthorized access and accidental damage.
Your next steps should be to apply this knowledge. Set up a virtual machine or a Docker container and practice these commands. Create files and directories, change their ownership, and manipulate their permissions. Try setting up a shared directory using the SGID bit. By building this muscle memory, you will transform theoretical knowledge into a practical skill set, making you a more confident and competent Linux system administrator.


