Introduction to Flexible Storage with LVM
In the world of Linux system administration, managing disk space is a fundamental and recurring task. Traditional disk partitioning, while effective, has a significant drawback: inflexibility. Once you’ve carved up a disk into partitions, resizing them can be a complex and risky operation, often requiring downtime and intricate data shuffling. This rigidity poses a challenge for modern systems, from a sprawling Linux Server to a developer’s workstation running Fedora Linux or Arch Linux, where storage needs are constantly evolving. This is where the Logical Volume Manager (LVM) comes in.
LVM is a powerful device mapper framework in the Linux Kernel that provides an abstraction layer between your physical hard drives and the file systems your operating system uses. Instead of mounting a static partition like /dev/sda2, you mount a flexible “logical volume.” This approach transforms static physical storage into a dynamic, pooled resource that can be resized, extended across multiple disks, and snapshotted on the fly. For anyone involved in Linux Administration, Linux DevOps, or managing critical infrastructure, understanding LVM is not just a skill—it’s a necessity for building scalable and resilient systems.
The Core Concepts: Understanding LVM’s Architecture
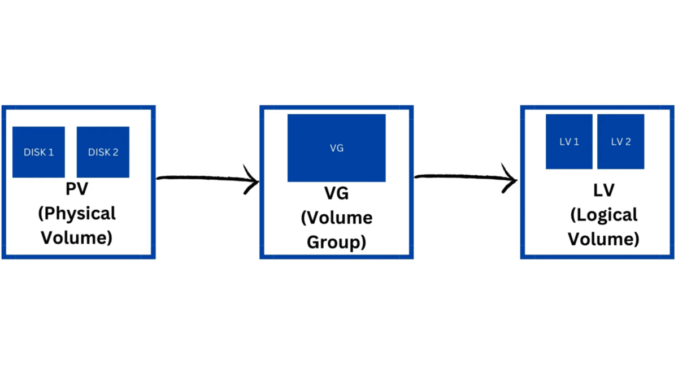
To effectively use LVM, you must first understand its three fundamental building blocks. This hierarchical structure is what gives LVM its power and flexibility. Think of it as building with storage Legos: you start with small pieces, combine them into larger blocks, and then build your final structures from those blocks.
Physical Volumes (PVs)
A Physical Volume is the most basic component in the LVM stack. A PV is typically a whole physical disk (e.g., /dev/sdb) or a standard disk partition (e.g., /dev/sdb1) that has been initialized for use by LVM. You use the pvcreate command to mark a partition or disk as available for LVM to pool. These PVs are the raw storage material that you will use to build your storage pool. You can have multiple PVs from different disks, allowing you to combine the capacity of several drives.
Volume Groups (VGs)
A Volume Group is the central component of LVM. It is a pool of storage created by grouping one or more Physical Volumes together. You can think of a VG as a single, large virtual disk. For example, you could combine two 1TB PVs to create a single 2TB VG named data_vg. The VG abstracts the underlying physical disks, so you no longer have to worry about which specific drive your data resides on. The vgcreate command is used to create a new VG from available PVs. This is a critical step in Linux Disk Management as it establishes the total available storage pool.
Logical Volumes (LVs)
Logical Volumes are the final piece of the puzzle. An LV is carved out from the available space within a Volume Group and is functionally equivalent to a traditional partition. These are the block devices that you will format with a Linux File System (like ext4 or XFS) and mount on your system (e.g., at /home or /var/www). The key advantage is that LVs are not tied to a specific physical location on a disk. They can be easily resized, extended, or even moved as long as there is free space in the parent VG. You create LVs with the lvcreate command.
Here is a simple example of initializing a disk partition and checking its status using essential Linux Commands.
# First, ensure you have a partition ready (e.g., /dev/sdb1)
# Use fdisk or parted to create a partition of type 'Linux LVM' (8e)

# Initialize the partition as a Physical Volume
sudo pvcreate /dev/sdb1

# Verify the Physical Volume creation
sudo pvs

# You should see output similar to this:
# PV         VG Fmt  Attr PSize   PFree
# /dev/sdb1     lvm2 a--  <100.00g <100.00g
Practical Implementation: Building Your First LVM Setup
Theory is great, but the best way to learn LVM is by doing. This section provides a practical, step-by-step Linux Tutorial for setting up a basic LVM configuration on a system like Ubuntu Tutorial or CentOS. For this example, let’s assume you have two empty partitions, /dev/sdb1 and /dev/sdc1, ready for use.
Step 1: Initialize Physical Volumes
The first step is to tell LVM that these partitions are available for it to manage. We use the pvcreate command on both partitions.
# Initialize both partitions as Physical Volumes
sudo pvcreate /dev/sdb1 /dev/sdc1

# Display a detailed view of the created PVs
sudo pvdisplay
Step 2: Create a Volume Group
Now that we have our building blocks (PVs), we can combine them into a single storage pool (VG). We’ll name our VG web_storage_vg, which is a descriptive name suitable for a Linux Web Server running Apache or Nginx.
# Create a Volume Group named 'web_storage_vg' using the two PVs
sudo vgcreate web_storage_vg /dev/sdb1 /dev/sdc1

# Verify the Volume Group creation
sudo vgs

# Example output:
# VG             #PV #LV #SN Attr   VSize   VFree
# web_storage_vg   2   0   0 wz--n- <199.99g <199.99g
Step 3: Carve Out Logical Volumes
With our VG in place, we can create the “virtual partitions” or LVs. Let’s create two LVs: one for web application data and another for database files, a common scenario for a MySQL Linux or PostgreSQL Linux server.
# Create a 50GB Logical Volume for web data
sudo lvcreate -L 50G -n web_data_lv web_storage_vg

# Create a 100GB Logical Volume for database files
sudo lvcreate -L 100G -n db_data_lv web_storage_vg

# Verify the Logical Volumes
sudo lvs

# Example output:
# LV          VG             Attr       LSize   Pool Origin Data%  Meta%  Move Log Cpy%Sync Convert
# db_data_lv  web_storage_vg -wi-a----- 100.00g
# web_data_lv web_storage_vg -wi-a-----  50.00g
Step 4: Format and Mount the Logical Volumes
The newly created LVs are raw block devices. They need a filesystem before they can be used. After formatting, you can mount them and add them to /etc/fstab to make the mount persistent across reboots.
# Format the LVs with the ext4 filesystem
sudo mkfs.ext4 /dev/web_storage_vg/web_data_lv
sudo mkfs.ext4 /dev/web_storage_vg/db_data_lv

# Create mount points
sudo mkdir -p /var/www/html
sudo mkdir -p /var/lib/mysql_data

# Mount the LVs
sudo mount /dev/web_storage_vg/web_data_lv /var/www/html
sudo mount /dev/web_storage_vg/db_data_lv /var/lib/mysql_data

# For persistence, add entries to /etc/fstab
# /dev/mapper/web_storage_vg-web_data_lv /var/www/html ext4 defaults 0 2
# /dev/mapper/web_storage_vg-db_data_lv /var/lib/mysql_data ext4 defaults 0 2
Advanced LVM Techniques for System Administrators
The true power of LVM shines in its advanced capabilities, which are indispensable for dynamic System Administration and Linux DevOps workflows. These features provide the flexibility needed to manage modern, scalable infrastructure.
Resizing Logical Volumes Online
One of LVM’s most celebrated features is the ability to resize logical volumes without unmounting them (for most filesystems). Imagine your web application’s data volume is filling up. With LVM, you can extend it in minutes. The process involves two steps: extending the logical volume and then resizing the filesystem to use the new space.
# Check free space in the Volume Group
sudo vgdisplay web_storage_vg

# Extend the logical volume by 20 Gigabytes
sudo lvextend -L +20G /dev/web_storage_vg/web_data_lv

# Resize the ext4 filesystem online to use the new space
sudo resize2fs /dev/web_storage_vg/web_data_lv

# Verify the new size with df -h
df -h /var/www/html
Note: Shrinking a volume is also possible but more dangerous. You must shrink the filesystem *before* shrinking the logical volume to avoid data loss. Not all filesystems (like XFS) support shrinking.
LVM Snapshots for Backups and Testing
LVM snapshots allow you to create a point-in-time, read-only (or read-write) copy of a logical volume. This is incredibly useful for creating consistent Linux Backup copies of active systems, like a busy database, without taking the service offline. Snapshots use a “copy-on-write” mechanism; they only store changes made to the original volume after the snapshot was taken, making them very space-efficient initially.

# Create a 5GB snapshot of the database volume
sudo lvcreate --size 5G --snapshot --name db_backup_snap /dev/web_storage_vg/db_data_lv

# Create a temporary mount point for the snapshot
sudo mkdir /mnt/db_backup

# Mount the snapshot (read-only is safer for backups)
sudo mount -o ro /dev/web_storage_vg/db_backup_snap /mnt/db_backup

# Now you can back up the data from /mnt/db_backup
# tar -czf /backups/db-backup.tar.gz -C /mnt/db_backup .

# When finished, unmount and remove the snapshot to free up space
sudo umount /mnt/db_backup
sudo lvremove /dev/web_storage_vg/db_backup_snap
Thin Provisioning
For advanced use cases like virtualization with Linux Docker or Kubernetes Linux, thin provisioning is a game-changer. It allows you to create logical volumes that are larger than the physically available storage. The storage space is allocated from the thin pool only when it is actually written to. This “over-committing” of resources improves storage efficiency in environments with many VMs or containers, making it a key technique for Linux Cloud deployments on AWS Linux or Azure Linux.
Best Practices, Pitfalls, and Integration
While LVM is incredibly powerful, using it effectively requires adherence to best practices and an awareness of potential pitfalls. Proper planning and careful execution are key to leveraging its full potential without introducing unnecessary risk.
Best Practices and Optimization
- Descriptive Naming: Use a clear and consistent naming scheme for your PVs, VGs, and LVs (e.g.,
vg_database,lv_pgdata). This becomes crucial in complex environments. - Leave Free Space: Don’t allocate 100% of your VG space to LVs immediately. Leaving some free space provides the flexibility to extend volumes or create snapshots when needed.
- Monitor Your VGs: Regularly use
vgdisplayor other System Monitoring tools to keep an eye on free space. This is a core part of proactive Performance Monitoring. - Automate with Scripting: For repetitive tasks, use Bash Scripting or Python Scripting to manage LVM. This is common for Python System Admin roles and can be integrated into Ansible playbooks for full Linux Automation.
Common Pitfalls to Avoid
- Forgetting to Resize Filesystems: A common mistake is extending an LV with
lvextendbut forgetting to runresize2fsorxfs_growfs. The LV will be larger, but the filesystem won’t be able to use the new space. - Complex VG Spanning: While you can span a VG across many disks, be aware of the risks. If one disk in the VG fails, it can corrupt data across the entire VG (unless you are using LVM with RAID).
- Snapshot Overflows: Snapshots have a fixed size. If too many changes occur on the origin volume, the snapshot can run out of space and become invalid. Monitor snapshot usage with
lvs.
Integration with RAID and Encryption
LVM is not a replacement for RAID. Instead, they work together beautifully. A common and robust setup is to first create a hardware or software RAID array (e.g., RAID 5, RAID 6) for redundancy and then use the resulting /dev/md0 device as a single PV for LVM. This gives you the best of both worlds: hardware-level redundancy from RAID and management flexibility from LVM. Similarly, for enhanced Linux Security, you can use LUKS (Linux Unified Key Setup) to encrypt an entire partition and then create your LVM Physical Volume on top of the unlocked, decrypted device mapper volume, ensuring all data within your LVs is encrypted at rest.
Conclusion: The Future of Your Linux Storage
Logical Volume Management is a cornerstone of modern Linux Administration. It moves beyond the rigid constraints of traditional partitioning, offering a dynamic, scalable, and feature-rich solution for managing storage. By mastering the concepts of Physical Volumes, Volume Groups, and Logical Volumes, you gain the ability to resize filesystems on the fly, create instant snapshots for safe backups, and build complex storage solutions that combine the strengths of LVM, RAID, and encryption. Whether you’re managing a single Linux Server, a fleet of containers, or a high-performance desktop, embracing LVM is a critical step toward building more resilient and adaptable systems.
Your next step should be to practice. Set up a virtual machine, add a few virtual disks, and walk through the commands in this guide. Experiment with resizing volumes, creating and reverting snapshots, and see for yourself how LVM can transform your approach to Linux Disk Management.


