In the world of Linux system administration, few tools are as fundamental and ubiquitous as the Secure Shell (SSH). It is the bedrock of remote server management, providing an encrypted, secure channel for accessing and controlling Linux systems across any network. Whether you are a seasoned DevOps engineer automating deployments on a fleet of cloud servers, a developer accessing a staging environment, or a hobbyist managing a personal web server, a deep understanding of SSH is non-negotiable. It transforms the command line from a local utility into a powerful interface for global infrastructure management.
This comprehensive guide will take you on a journey through the world of Linux SSH. We’ll start with the core concepts of secure authentication, move on to practical daily usage and configuration, explore advanced techniques for power users, and finish with critical security best practices to harden your servers. By the end of this article, you’ll have the knowledge to use SSH not just as a simple login tool, but as a versatile and secure foundation for all your Linux administration tasks, from managing an Ubuntu server to orchestrating containers with Kubernetes on Linux.
The Foundations of SSH: Core Concepts and Authentication
At its heart, SSH is a client-server protocol that provides a secure channel over an unsecured network. When you connect to a server, the SSH client on your local machine initiates a connection with the SSH daemon (sshd) running on the remote server. The magic of SSH lies in its robust authentication and encryption mechanisms, which ensure that your data, including your login credentials and the commands you execute, is protected from eavesdropping.
Password vs. Public-Key Authentication
The most basic form of authentication is using a password. While simple, it’s vulnerable to brute-force attacks, where an attacker repeatedly tries to guess the password. A far more secure and recommended method is public-key cryptography.
This method involves creating a pair of cryptographic keys: a private key and a public key.
- Private Key: This key remains on your client machine. It must be kept secret and protected with a strong passphrase. It’s the proof of your identity.
- Public Key: This key is copied to the remote server(s) you want to access. It can be shared freely without compromising security.
When you attempt to connect, the server uses the public key to issue a challenge that only the corresponding private key can solve. This process authenticates you without ever sending your private key or passphrase over the network, making it a cornerstone of modern Linux security.
Generating and Deploying Your SSH Keys
Creating and deploying SSH keys is a straightforward process. The primary tool for this is ssh-keygen, a standard utility available on virtually every Linux distribution, from Debian Linux to Red Hat Linux.
First, generate your key pair on your local machine. The ED25519 algorithm is currently recommended for its strong security and excellent performance.
# Generate a new ED25519 SSH key pair
# -t specifies the algorithm type
# -C adds a comment, usually your email address for identification
ssh-keygen -t ed25519 -C "your_email@example.com"

# Follow the prompts:
# Enter file in which to save the key (/home/user/.ssh/id_ed25519): [Press Enter]
# Enter passphrase (empty for no passphrase): [Enter a strong passphrase]
# Enter same passphrase again: [Confirm passphrase]
Once your keys are generated, you need to copy the public key to the remote server. The ssh-copy-id utility is the easiest and most reliable way to do this, as it automatically sets the correct file permissions on the remote server’s ~/.ssh/authorized_keys file, a critical step for ensuring Linux permissions are correctly configured.
# Copy your public key to the remote server
# This will prompt you for the remote user's password one last time
ssh-copy-id username@remote_host_ip

# Example:
ssh-copy-id admin@192.168.1.100
After this, you can log in to your server without a password, using only your SSH key’s passphrase if you set one. This is the first major step in professionalizing your Linux administration workflow.
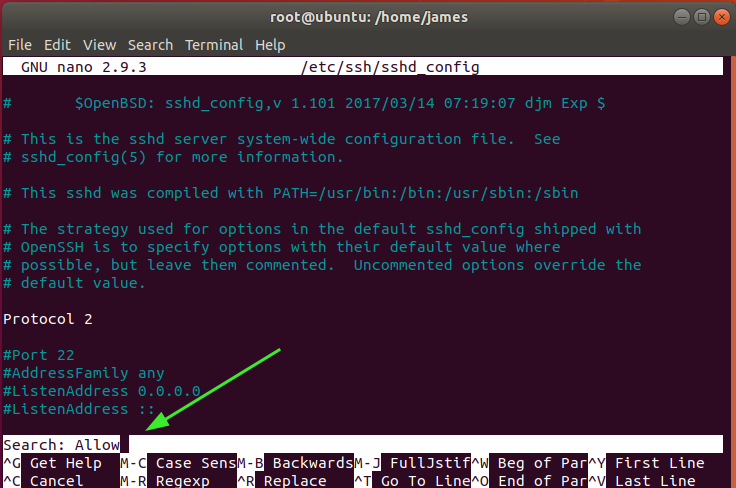
Linux terminal SSH command – How to Use Nano in Linux – Linux Hint
Practical SSH Usage and Configuration
With key-based authentication set up, you can start leveraging SSH for more than just logging in. A well-structured configuration can dramatically improve your efficiency, especially when managing multiple servers.
The SSH Config File: Your Command Center
Instead of typing ssh -p 2222 -i ~/.ssh/work_key user@123.45.67.89 every time, you can create aliases and define connection parameters in your local SSH configuration file, located at ~/.ssh/config. This file allows you to create shortcuts for your hosts, making your Linux terminal workflow much smoother.
Here is an example of a powerful ~/.ssh/config file that defines multiple hosts with different users, ports, and identity files.
# Default settings for all hosts
Host *
  User mydefaultuser
  ConnectTimeout 10
  ServerAliveInterval 60

# Production Web Server
Host prod-web-01
  HostName 198.51.100.10
  User webadmin
  Port 2222
  IdentityFile ~/.ssh/prod_key

# Staging Database Server
Host staging-db
  HostName db.staging.example.com
  User dbuser
  IdentityFile ~/.ssh/staging_key
  # This line enables local port forwarding by default upon connection
  LocalForward 8080 127.0.0.1:5432

# Generic AWS Linux instance
Host aws-dev
  HostName ec2-34-229-100-200.compute-1.amazonaws.com
  User ec2-user
  IdentityFile ~/.ssh/aws-ec2.pem
With this configuration, you can now connect to your production web server simply by typing ssh prod-web-01. This approach is invaluable for both manual system administration and for use in bash scripting and automation.
Secure Tunneling with Port Forwarding
SSH is more than a remote shell; it’s a tool for secure Linux networking. One of its most powerful features is port forwarding (or SSH tunneling), which allows you to forward traffic from a port on your local machine to a port on the remote server, or vice-versa. This is incredibly useful for securely accessing services that are not exposed to the public internet, such as a database or a web application’s admin panel.
For example, let’s say you have a PostgreSQL Linux database running on your remote server that only listens on its local interface (127.0.0.1) for security reasons. You can use local port forwarding to securely connect to it from your local machine.
# Forward local port 8080 to port 5432 on the remote server
# -L [local_port]:[destination_host]:[destination_port]
# destination_host is from the perspective of the remote server, so 127.0.0.1 is the server itself.
# -N: Do not execute a remote command. Just forward the port.
# -f: Go into the background.

ssh -L 8080:127.0.0.1:5432 -N -f user@remote_host_ip

# You can now connect to your remote database using a local client
# by pointing it to localhost:8080
psql -h localhost -p 8080 -U my_db_user -d my_database
This technique creates an encrypted tunnel for your database connection, ensuring that your data is secure even when you’re working from an untrusted network like a coffee shop Wi-Fi.
Advanced SSH Techniques for Power Users and DevOps
For those working in Linux DevOps, automation, or managing complex infrastructure, SSH offers even more advanced capabilities that streamline workflows and enhance security across multiple systems.
SSH Agent and Agent Forwarding
If you protect your private SSH key with a passphrase (and you should), you’ll need to enter it every time you use the key. The ssh-agent is a background program that holds your decrypted private keys in memory, allowing you to use them without re-entering your passphrase for the duration of your session.

Linux terminal SSH command – Saravana J
You can add your key to the agent with ssh-add:

# Start the agent in the background (often started automatically with your desktop session)
eval "$(ssh-agent -s)"

# Add your private key to the agent
ssh-add ~/.ssh/id_ed25519
Agent forwarding takes this a step further. It allows you to use your local SSH keys to authenticate on a second remote server when you connect to it from a first remote server (a “jump host” or “bastion”). This is a secure way to navigate multi-server environments without ever copying your private keys to an intermediate server. You can enable it with the -A flag or in your ~/.ssh/config file with the ForwardAgent yes directive.
Persistent Sessions with Tmux and Screen
A common frustration with SSH is that if your network connection drops, your remote session and all running processes are terminated. This is where terminal multiplexers like Tmux and Screen become essential Linux tools. These utilities allow you to create persistent sessions on the remote server that continue to run even after you disconnect. You can then re-attach to your session later from any machine, finding your workspace exactly as you left it. This is indispensable for long-running tasks like code compilation, data processing, or running a Linux backup.
Integrating SSH with Automation Tools
SSH is the transport layer for the vast majority of Linux automation tools. Configuration management frameworks like Ansible, for instance, rely entirely on SSH to connect to managed nodes, execute commands, and transfer files. A well-configured SSH setup, with key-based authentication and a proper `config` file, is a prerequisite for effective Linux automation. This synergy is a cornerstone of modern Linux DevOps practices, enabling engineers to manage hundreds or thousands of servers, from bare metal to containers on a Kubernetes Linux cluster, as easily as one.
Hardening Your SSH Server: Security Best Practices
A default SSH server configuration is reasonably secure, but for any production system, it’s crucial to implement additional hardening measures. These changes are made in the SSH daemon’s configuration file, typically located at /etc/ssh/sshd_config. After making any changes, you must restart the SSH service (e.g., sudo systemctl restart sshd).
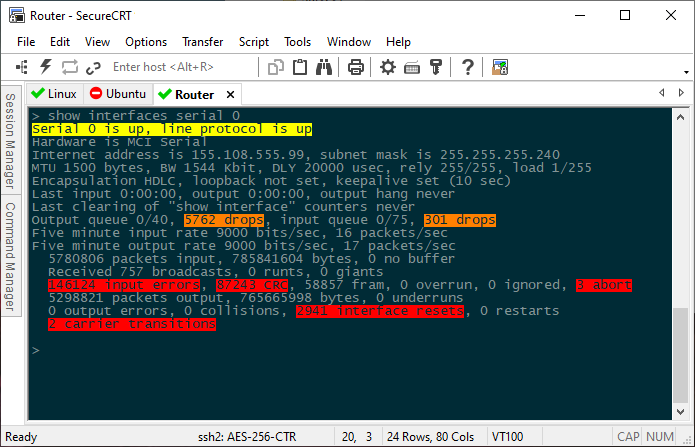
Linux terminal SSH command – SecureCRT – The rock-solid Telnet and SSH client for Windows …
Essential `sshd_config` Modifications
- Disable Root Login: Logging in directly as the root user is a significant security risk. Always log in as a regular user and elevate privileges with
sudowhen needed.PermitRootLogin no - Disable Password Authentication: Once you have key-based authentication working reliably, you should disable password-based logins entirely to eliminate the threat of brute-force attacks.
PasswordAuthentication no - Change the Default Port: While this is “security through obscurity,” changing the port from the default of 22 can significantly reduce the number of automated scans and brute-force attempts against your server. Pick a non-standard port (e.g., above 1024).
Port 2222 - Limit User Access: You can restrict which Linux users or groups are allowed to log in via SSH.
AllowUsers user1 user2AllowGroups ssh-admins
Using a Firewall and Intrusion Prevention
Your SSH server should be protected by a firewall. Tools like iptables or simpler front-ends like UFW (Uncomplicated Firewall) on Ubuntu can be used to restrict access to your SSH port to only known, trusted IP addresses. This is a powerful layer of Linux security.
Furthermore, you should install a tool like Fail2Ban. It monitors log files for repeated failed login attempts and automatically updates firewall rules to block the offending IP addresses for a configurable period. This provides active protection against automated brute-force attacks.
For environments requiring the highest level of security, such as those running on Red Hat Linux or CentOS, you can leverage security modules like SELinux to enforce mandatory access control policies on the SSH daemon, further restricting its capabilities and potential attack surface.
Conclusion: Mastering Your Remote Domain
SSH is far more than a simple command for gaining a remote shell. It is a comprehensive, secure, and extensible protocol that serves as the backbone of modern Linux and cloud infrastructure management. We’ve journeyed from the fundamental principles of public-key cryptography to the practical efficiencies of a well-crafted configuration file, the advanced power of agent forwarding and tunneling, and the critical importance of server-side security hardening.
By mastering these techniques, you elevate your capabilities as a system administrator, developer, or DevOps professional. A secure and efficient SSH workflow allows you to manage your Linux servers with confidence and precision, whether you’re performing routine system monitoring with `htop`, deploying applications with Ansible, or troubleshooting a complex issue on a remote machine. The next step is to apply these practices to your own environment. Harden your servers, organize your client configuration, and explore how SSH can be integrated into your Python scripting or other automation efforts to build a more robust and secure infrastructure.


