Mastering Data Redundancy and Performance with RAID on Linux
In the world of System Administration and Linux DevOps, ensuring data integrity and availability is paramount. Whether you’re managing a high-traffic Linux Web Server, a critical Linux Database, or simply a home file server, a single disk failure can lead to catastrophic data loss and downtime. This is where RAID, or a Redundant Array of Independent Disks, becomes an indispensable technology. RAID is a storage virtualization technique that combines multiple physical disk drives into one or more logical units for the purposes of data redundancy, performance improvement, or both.
This comprehensive Linux Tutorial will guide you through the core concepts of RAID, from understanding the fundamental levels to practical, hands-on implementation using the powerful mdadm utility on popular Linux Distributions like Ubuntu, Debian Linux, and CentOS. We’ll explore creating, managing, and monitoring RAID arrays, providing you with the skills needed for robust Linux Disk Management. By the end of this article, you’ll not only understand the theory but also be able to confidently deploy and maintain resilient storage solutions on any Linux Server.
Deconstructing RAID: A Look at the Standard Levels
RAID is not a monolithic solution but a collection of standardized configurations known as “levels.” Each level offers a different balance between fault tolerance, performance, and storage capacity. Choosing the right level is crucial and depends entirely on your specific application’s needs. Before we dive into Linux Commands, let’s break down the most common RAID levels.
RAID 0 (Striping): The Need for Speed
RAID 0 focuses exclusively on performance. It works by “striping” data across at least two disks, meaning blocks of data are written to multiple disks simultaneously. This nearly doubles the read and write speed for every disk you add. However, this speed comes at a high price: there is zero redundancy. If a single disk in a RAID 0 array fails, the entire array is lost, as parts of every file are scattered across all disks.
- Pros: Excellent performance.
- Cons: No fault tolerance.
- Use Case: Video editing scratch disks, temporary data processing, or any application where speed is critical and data is either temporary or backed up elsewhere.
RAID 1 (Mirroring): The Safety Net
RAID 1 is all about redundancy. In a RAID 1 configuration, data is written identically to two or more disks, creating a “mirror.” If one disk fails, the other continues to operate, providing seamless access to the data. This makes it a very reliable choice for critical data. The downside is storage inefficiency; you only get the capacity of a single disk. For example, two 2TB disks in a RAID 1 array provide only 2TB of usable space.
- Pros: High fault tolerance; good read performance.
- Cons: Inefficient capacity (50% usable); write performance is limited to the speed of the slowest disk.
- Use Case: Operating system disks, critical application data, and databases like PostgreSQL Linux or MySQL Linux.
RAID 5 (Striping with Distributed Parity): The Balanced Performer
RAID 5 offers a compromise between performance, capacity, and redundancy. It stripes data across multiple disks (minimum of three) like RAID 0, but it also calculates a “parity” block for each stripe and writes it to one of the disks. This parity information can be used to reconstruct the data from a single failed disk. It’s more space-efficient than RAID 1, as only the equivalent of one disk’s capacity is used for parity.
- Pros: Good balance of speed, storage, and redundancy.
- Cons: Suffers from a write performance penalty due to parity calculations. Rebuild times on large arrays can be very long, leaving the array vulnerable during the process.
- Use Case: General-purpose file servers, application servers, and backup repositories.
RAID 10 (1+0): The Best of Both Worlds
RAID 10, also known as a “stripe of mirrors,” is a nested or hybrid RAID level. It requires a minimum of four disks and combines the speed of RAID 0 with the redundancy of RAID 1. It first creates mirrored pairs of disks (RAID 1) and then stripes the data across these pairs (RAID 0). This results in excellent read/write performance and high fault tolerance, as it can survive multiple disk failures as long as no single mirror loses both its disks.
- Pros: High performance, high redundancy, and fast rebuild times.
- Cons: Expensive, with only 50% storage efficiency.
- Use Case: High-performance databases, virtual machine storage, and applications with heavy I/O workloads.
Before building an array, the first step is always to identify the disks you intend to use. The lsblk command is perfect for this task.
# List block devices with useful information
# This helps identify unpartitioned disks for your RAID array
lsblk -o NAME,SIZE,FSTYPE,TYPE,MOUNTPOINT
Building Your First RAID Array: A Hands-On Linux Tutorial
Theory is great, but practical application is where learning solidifies. For software RAID in the Linux world, mdadm (multiple disk and device administration) is the undisputed king. It’s a powerful utility for creating, managing, and monitoring software RAID arrays. This section provides a step-by-step guide to creating a RAID 5 array on a Linux Server.
Step 1: Preparing the Disks
First, ensure you have identified the disks you want to use (e.g., /dev/sdb, /dev/sdc, /dev/sdd). It’s critical that these disks do not contain any important data, as this process will be destructive. We will create a single partition on each disk that will be part of the array. Using fdisk or parted in the Linux Terminal is standard practice.
For each disk, you would typically run sudo fdisk /dev/sdx, create a new partition (n), set its type to “Linux raid autodetect” (t -> fd), and write the changes (w). This prepares the partitions (e.g., /dev/sdb1, /dev/sdc1, /dev/sdd1) for mdadm.
Step 2: Creating the RAID 5 Array
With our partitions ready, we can now use mdadm to create the logical device. The command below creates a new RAID 5 array named /dev/md0 using three partitions. This is one of the most fundamental Linux Commands for RAID management.
# Create a new RAID 5 array called /dev/md0
# --create: Specifies creation mode
# --verbose: Shows detailed output of the process
# --level=5: Sets the RAID level to 5
# --raid-devices=3: Specifies the number of active devices in the array
sudo mdadm --create --verbose /dev/md0 --level=5 --raid-devices=3 /dev/sdb1 /dev/sdc1 /dev/sdd1
After running this command, the system will begin building the array. You can monitor its progress by checking the /proc/mdstat file: watch cat /proc/mdstat.
Step 3: Persisting the Array Configuration
A newly created RAID array will not automatically re-assemble after a reboot unless its configuration is saved. We need to tell mdadm to scan the new array and append its configuration to the main configuration file, typically /etc/mdadm/mdadm.conf.
# Scan the active arrays and append the configuration to the mdadm config file
# This ensures the array is re-assembled on system boot
sudo mdadm --detail --scan | sudo tee -a /etc/mdadm/mdadm.conf
Finally, you need to create a filesystem on your new RAID device (e.g., sudo mkfs.ext4 /dev/md0) and then mount it (e.g., sudo mount /dev/md0 /mnt/data). Don’t forget to add it to /etc/fstab to make the mount permanent!
Advanced Linux Disk Management: Monitoring and Maintaining Your RAID
Creating an array is just the beginning. Proper System Monitoring and maintenance are crucial for ensuring the long-term health of your data. RAID protects against hardware failure, but only if you act when a failure occurs.
Monitoring Array Health and Simulating Failure
Proactive monitoring is a core tenet of Linux Administration. You should regularly check the status of your arrays. The mdadm --detail command provides a comprehensive report.
# Get a detailed report of the RAID array's status
sudo mdadm --detail /dev/md0
To practice recovery, you can simulate a disk failure. The following commands will manually fail a disk and then remove it from the array, placing the array in a “degraded” state.
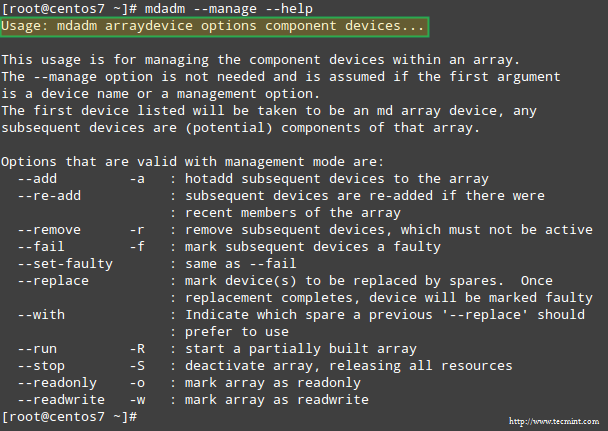
# Manually fail a disk in the array
sudo mdadm /dev/md0 --fail /dev/sdd1

# Remove the failed disk from the array
sudo mdadm /dev/md0 --remove /dev/sdd1
Replacing a Failed Disk and Rebuilding

Once a disk has failed (or been manually removed), you must replace it to restore redundancy. After physically replacing the hardware and creating a compatible partition on the new disk (e.g., /dev/sde1), you can add it back to the array.
sudo mdadm /dev/md0 --add /dev/sde1

mdadm will automatically begin the rebuilding process, using the parity data to reconstruct the missing information onto the new disk. You can monitor this critical process using watch cat /proc/mdstat. The array will be vulnerable to another disk failure until the rebuild is complete.
Automated Monitoring with Bash Scripting
For true Linux Automation, you shouldn’t rely on manual checks. The mdadm daemon can be configured to send email alerts. Alternatively, a simple cron job running a Bash Scripting check can provide peace of mind. Here is a basic script to check the health of all RAID arrays and send an email if an issue is found.
#!/bin/bash
# A simple RAID health check script for cron

# Get the hostname for the email subject
HOSTNAME=$(hostname)
# Email address for alerts
ADMIN_EMAIL="admin@example.com"

# Check if mdadm is installed
if ! command -v mdadm &> /dev/null; then
    exit 0
fi

# Find all active md devices
MD_DEVICES=$(grep -o '^md[0-9]*' /proc/mdstat)

if [ -z "$MD_DEVICES" ]; then
  exit 0 # No RAID arrays found
fi

for device in $MD_DEVICES; do
  STATE=$(mdadm --detail /dev/$device | grep "State :" | awk '{print $3, $4, $5}')
  if [[ "$STATE" != "active" && "$STATE" != "clean" ]]; then
    BODY="ALERT: RAID array /dev/$device on host $HOSTNAME is in a degraded state: $STATE. Please investigate immediately."
    echo "$BODY" | mail -s "RAID Alert on $HOSTNAME" "$ADMIN_EMAIL"
  fi
done
Best Practices for Robust RAID Deployments
Deploying RAID effectively involves more than just running commands. Following best practices ensures your storage is reliable, performant, and manageable for the long term. This is especially important in production environments, whether on-premise or in the cloud with services like AWS Linux or Azure Linux.
Hardware RAID vs. Software RAID
While this article focuses on software RAID with mdadm, it’s important to know the alternative. Hardware RAID uses a dedicated controller card with its own processor and often a battery-backed cache. This offloads the RAID calculations from the main CPU, potentially offering better performance, especially for parity-based RAID levels like 5 and 6. However, it’s more expensive and can lead to vendor lock-in. Software RAID is incredibly flexible, cost-effective, and portable across any Linux machine, making it a popular choice for many scenarios.
The Golden Rule: RAID is Not a Backup
This is the most critical takeaway. RAID is not a backup. It protects against physical disk failure, nothing more. It will not protect you from:
- Accidental file deletion (
rm -rf /) - Filesystem corruption
- Malware or ransomware attacks
- Natural disasters like fire or flood
A robust Linux Backup strategy, such as using tools like rsync, restic, or Bacula to create off-site or immutable copies of your data, is absolutely non-negotiable.
Synergy with LVM (Logical Volume Management)
For the ultimate in Linux Disk Management flexibility, combine RAID with LVM. The standard practice is to create the RAID array first (e.g., /dev/md0) to handle redundancy at the hardware level. Then, use that entire RAID device as a single Physical Volume (PV) for LVM. This allows you to create, resize, and manage multiple Logical Volumes (LVs) on top of your fault-tolerant RAID array, giving you the best of both worlds.
Common Pitfalls to Avoid
- Ignoring Alerts: Set up monitoring and act on alerts immediately. A degraded array is a single point of failure.
- Using Mismatched Disks: While possible, using disks of varying sizes or speeds will limit the array’s capacity to the smallest disk and its performance to the slowest disk.
- Not Having Spares: For critical systems, configure a “hot spare” (
mdadm --add-spare). This is an idle disk thatmdadmwill automatically use to start a rebuild the instant another disk fails, minimizing the time the array is in a degraded state.
Conclusion: Building a Foundation of Reliable Storage
RAID is a foundational technology for any serious Linux Administration task that involves data storage. By combining multiple disks, it provides a powerful solution to the inherent fallibility of single-disk systems, delivering either enhanced performance, robust fault tolerance, or a strategic mix of both. We’ve journeyed from the core concepts of RAID levels 0, 1, 5, and 10 to the practical implementation and management of software RAID arrays using the indispensable mdadm utility.
The key takeaways are clear: choose the right RAID level for your workload, use mdadm for flexible and powerful control, and implement proactive monitoring to ensure array health. Most importantly, never forget the golden rule: RAID protects against disk failure, but it is not a substitute for a comprehensive backup strategy. By mastering these principles, you are well-equipped to build and maintain resilient, high-performance storage solutions that form the bedrock of a stable and reliable Linux infrastructure.


